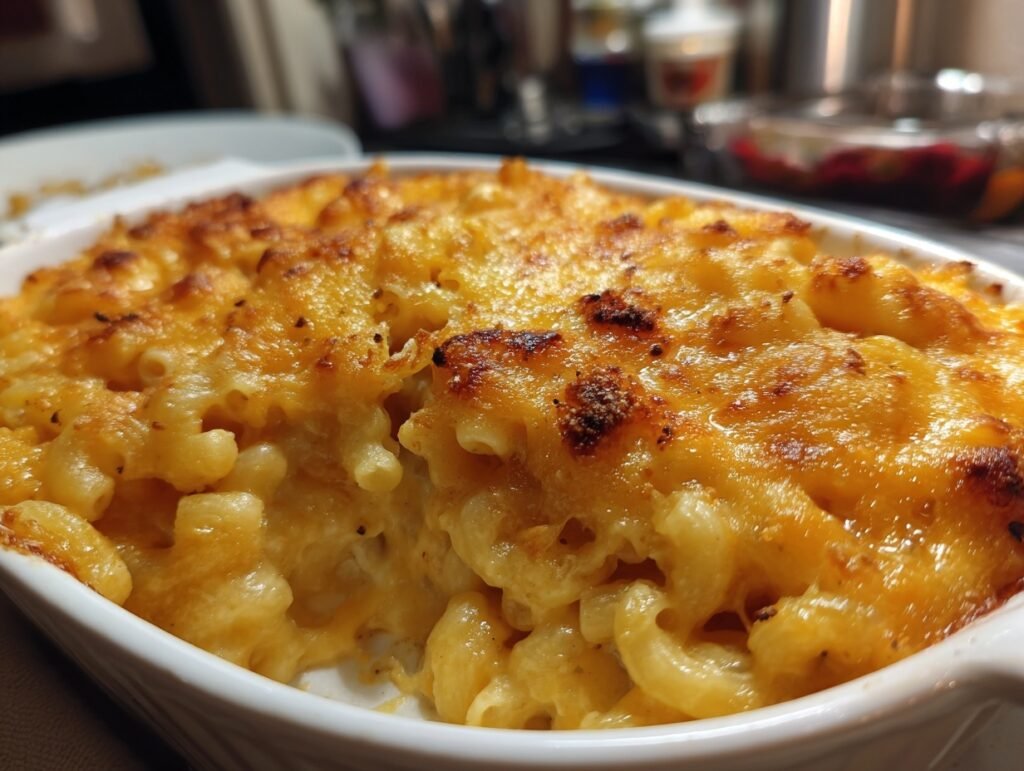
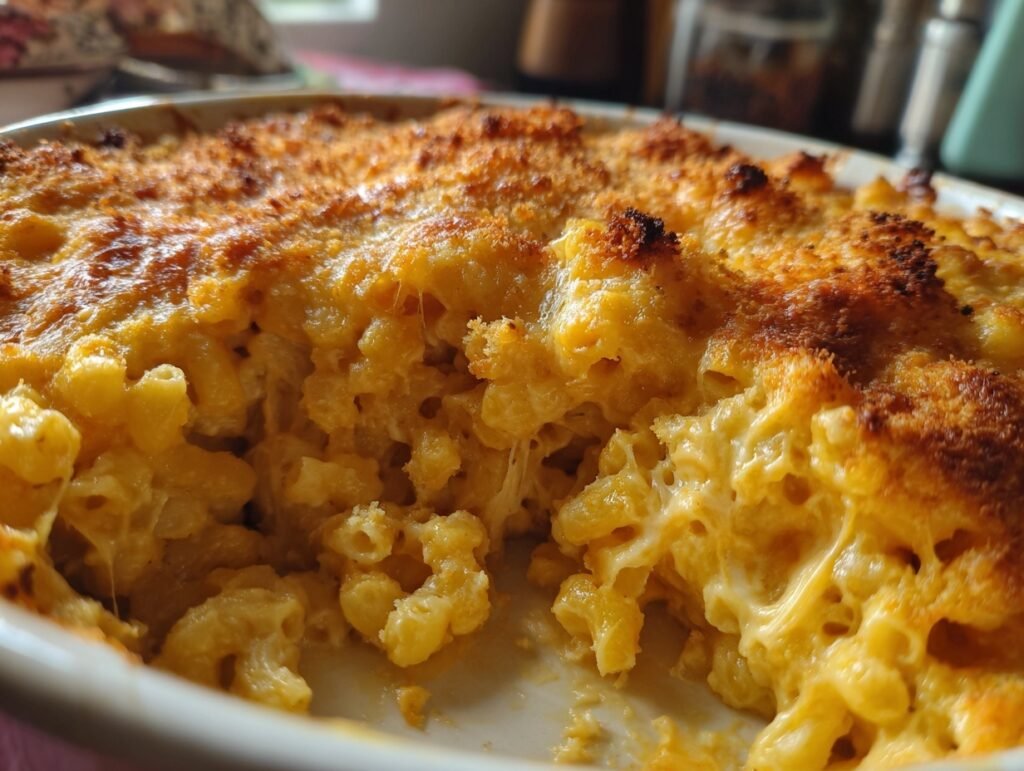
Imagine pulling a bubbling, golden-crusted pan of Baked Mac and Cheese from the oven, where rivers of creamy, sharp cheddar cheese ooze between tender elbow macaroni, releasing an irresistible aroma of buttery warmth, subtle garlic whispers, and onion depth that fills your kitchen like a cozy hug. That first bite? Pure bliss—crispy, seasoned breadcrumbs crown a velvety sauce so rich and tangy it melts on your tongue, evoking childhood comfort with every cheesy pull. This isn’t just any mac and cheese; it’s a Pinterest dream, visually stunning with its glossy cheese pull and caramelized top, ready to steal the show at family dinners or potlucks.
What makes this Baked Mac and Cheese perfect for your feed? It’s ridiculously easy—no fancy gadgets needed—just simple steps yielding restaurant-worthy results that photograph like magic. Golden edges contrasting creamy centers? Instant share bait. For more cheesy inspiration, check out these mac and cheese recipes from Food Network. Whether you’re a busy parent craving weeknight wins or a host aiming for oohs and aahs, this dish delivers crowd-pleasing magic in under an hour. Pin it now, and watch your followers drool!
Why You’ll Love This Recipe
This Baked Mac and Cheese wins hearts with its quick prep—under 30 minutes to assemble before baking—leaving you more time to savor the moment. The visual wow-factor is unbeatable: a shimmering cheese blanket under crunchy breadcrumbs that begs for close-up shots. It’s versatile for any occasion, from cozy weeknights to holiday tables, evoking that feel-good nostalgia while looking effortlessly gourmet.
Emotionally, it’s a hug in food form—comforting, indulgent, and shareable joy that brings people together. Imagine the smiles as you scoop steaming portions, the golden crust cracking under forks. Its crowd-pleasing appeal makes it Pinterest gold: easy enough for beginners, stunning enough for influencers. You’ll love how it transforms basic pantry staples into a memory-making masterpiece everyone craves.
Ingredients
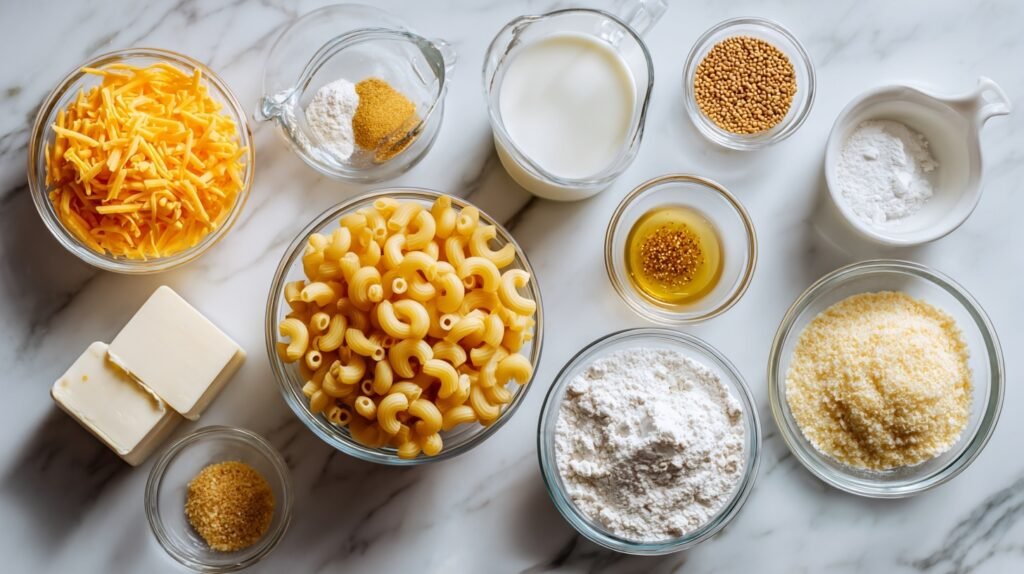
These ingredients harmonize perfectly for ultimate comfort: sharp cheddar delivers bold, melty tang; milk and butter create a silky béchamel base; flour thickens without lumps; mustard, garlic, and onion powders add savory depth; and breadcrumbs with melted butter form that crave-worthy crunch. Salt and pepper tie it all together for balanced bliss.
Ingredients (makes about 8 servings):
– 16 oz elbow macaroni
– 4 cups shredded sharp cheddar cheese (mild cheddar or a cheddar blend for creamier melt)
– 2 cups milk (whole milk for richness; 2% for lighter option)
– 1/4 cup unsalted butter (plus 2 tbsp melted for topping)
– 1/4 cup all-purpose flour (gluten-free 1:1 blend if needed)
– 1 tsp mustard powder
– 1/2 tsp garlic powder
– 1/2 tsp onion powder
– Salt and black pepper to taste
– 1 cup breadcrumbs (panko for extra crunch; whole wheat for nutty flavor)
Quick Overview
– Prep Time: 20 minutes
– Cook Time: 25 minutes
– Total Time: 45 minutes
– Servings: 8
– Difficulty Level: Easy
This Baked Mac and Cheese is a time-saver, fitting seamlessly into busy schedules with minimal hands-on effort. Boil pasta while prepping sauce—done in under an hour for hot, cheesy rewards that feel indulgent yet effortless.
Step-by-Step Instructions
Get ready to create the ultimate Baked Mac and Cheese—confidence comes easy with these foolproof steps. You’ll build a creamy sauce that clings perfectly to pasta, then bake to bubbly perfection. Visual cues guide you to pro results every time.
1. Preheat your oven to 375°F (190°C). Grease a 9×13-inch baking dish with a bit of butter for easy release and non-stick magic.
2. Bring a large pot of salted water to a rolling boil. Add 16 oz elbow macaroni and cook according to package directions until al dente—about 7-8 minutes. Drain well, but don’t rinse, to keep starch for sauce cling.
3. In a large saucepan over medium heat, melt 1/4 cup unsalted butter. Whisk in 1/4 cup all-purpose flour smoothly. Cook for 1-2 minutes, stirring constantly, until bubbly and golden—no lumps here!
4. Slowly pour in 2 cups milk while whisking vigorously. Continue cooking 3-5 minutes until the mixture thickens into a velvety sauce, coating the back of a spoon.
5. Stir in 1 tsp mustard powder, 1/2 tsp garlic powder, 1/2 tsp onion powder, and salt and black pepper to taste. Taste and adjust for that perfect savory kick.
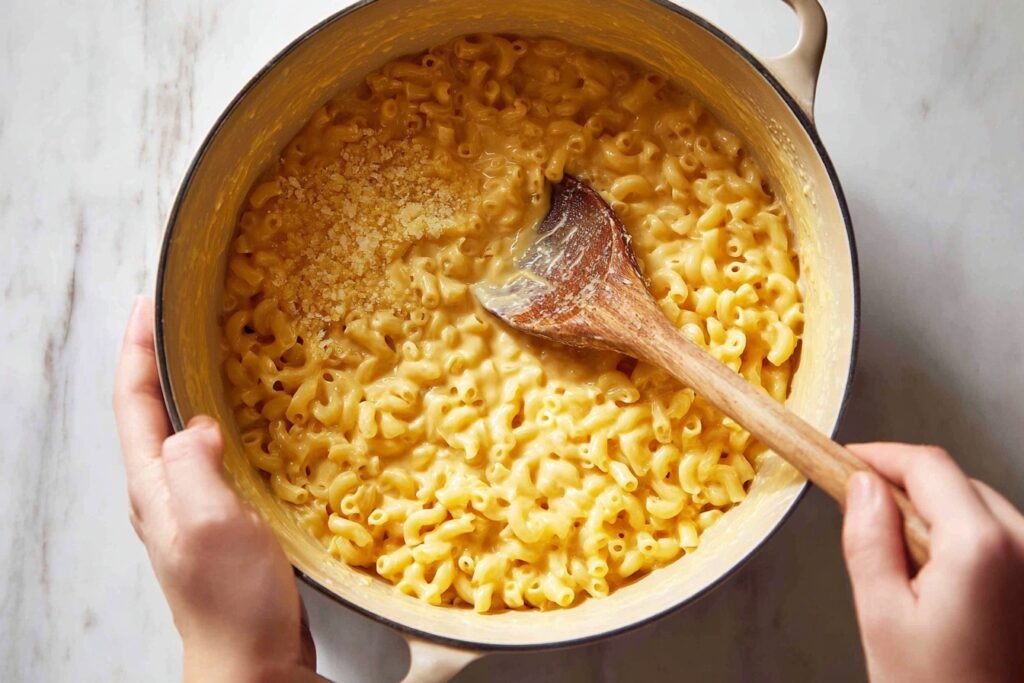
6. Remove from heat. Gradually add 4 cups shredded sharp cheddar cheese, stirring until fully melted and sauce is ultra-creamy, glossy, and smooth.
7. Fold the drained macaroni into the cheese sauce until every noodle is lovingly coated. Pour into the prepared baking dish, spreading evenly.
8. In a small bowl, mix 1 cup breadcrumbs with 2 tbsp melted butter until evenly moistened and crumbly.
9. Sprinkle the breadcrumb mixture evenly over the top of the Baked Mac and Cheese for that irresistible crunch.
10. Bake uncovered for 20-25 minutes, until the top is golden brown, edges bubble vigorously, and cheese peeks through invitingly.
11. Let rest 5-10 minutes before serving— this sets the creamy texture perfectly. Dig in to cheesy heaven!
Pro Tips for Perfect Results
Elevate your Baked Mac and Cheese with these game-changing tips for flawless texture, bold flavor, and Instagram-ready presentation.
1. Shred your own cheese: Pre-shredded varieties have anti-caking agents that hinder melt. Freshly shredded sharp cheddar ensures ultra-smooth, stretchy sauce.
2. Season the pasta water generously: Salt it like the sea— this infuses flavor into every elbow macaroni bite from the start.
3. Don’t overcook the roux: Cook butter-flour mixture just until lightly golden (1-2 minutes) to avoid raw flour taste while building nutty depth.
4. Room-temp milk prevents lumps: Warm your milk slightly before adding to the roux for seamless thickening and silky results.
5. Pulse breadcrumbs for even crunch: Use a food processor for fine, uniform texture that toasts evenly to perfect golden crispness.
6. Broil for extra golden top: Last 1-2 minutes under the broiler amps up the breadcrumb crust without overbaking the inside.
7. Rest is key: 10-minute cool-down firms up the dish, making scoops clean and cheese pulls photogenic.
Serving Ideas & Variations
Picture this: Baked Mac and Cheese scooped into rustic bowls, garnished with fresh chopped parsley for a pop of green against golden crust—pure eye candy for your table. Pair it with a crisp green salad tossed in lemon vinaigrette for balance, or roasted veggies like broccoli and carrots that soak up the cheesy goodness. For mains, serve alongside grilled chicken breasts or baked salmon fillets, letting the comforting mac steal the side-show spotlight.
Versatility shines here—add steamed peas or diced bell peppers into the sauce for hidden veggie pops of color and sweetness in your Baked Mac and Cheese. Craving spice? Stir in a pinch of cayenne with the powders for subtle heat. Make it a casserole star by layering with cooked ground beef or turkey for a hearty shepherd’s pie twist.
Presentation pro-move: Bake in individual ramekins for adorable single-serve portions, perfect for parties. Drizzle with hot sauce tableside for customizable fun, turning every gathering into a shareable feast that warms hearts and feeds souls.
Nutritional Highlights
This Baked Mac and Cheese balances indulgence with nourishment from quality dairy and grains. Sharp cheddar provides calcium for strong bones and protein for satiety; milk adds vitamin D and more protein; elbow macaroni offers energy-boosting carbs. Breadcrumbs contribute fiber for digestion, while spices enhance flavor without excess sodium.
Per serving (1/8 recipe): ~550 calories, 24g protein, 55g carbs, 28g fat (14g saturated), 3g fiber. It’s a comforting carb-protein combo fueling active days, with the cheese delivering probiotics for gut health when enjoyed fresh.
Storage Made Simple
Store leftovers in airtight containers in the fridge for up to 4 days— the Baked Mac and Cheese reheats beautifully, maintaining its creamy core. Portion into meal-prep bowls for grab-and-go ease, keeping that golden breadcrumb crunch intact as long as possible.
For longer storage, freeze unbaked portions in foil pans up to 2 months; thaw overnight in the fridge before baking. Reheat covered in a 350°F oven for 20-25 minutes until hot and bubbly, or microwave individual servings with a splash of milk to revive creaminess. Avoid sogginess by not overcrowding during reheating.
FAQs
Can I make this Baked Mac and Cheese dairy-free?
Absolutely! Swap cheddar for plant-based shreds, use almond or oat milk, and vegan butter. The roux method works perfectly—thicken as directed for creamy results without compromise.
How do I make it ahead?
Assemble fully up to 24 hours ahead, cover tightly, and refrigerate. Bake straight from cold, adding 5-10 extra minutes until bubbling and golden. Ideal for stress-free hosting!
Why is my sauce grainy?
Likely from rapid temperature changes or pre-shredded cheese. Use freshly shredded, add milk gradually over medium-low heat, and stir constantly. It’ll smooth out into velvet perfection.
Can I scale this for a crowd?
Double ingredients for 16 servings in two 9×13 pans—baking time stays similar. Prep sauce in batches to avoid lumps. Perfect for potlucks; freeze extras unbaked.
What if I don’t have mustard powder?
Dijon mustard (1 tsp wet for 1 tsp powder) adds the same tangy zip without overpowering. Blend into the milk first for seamless integration and enhanced cheesiness.
How do I fix a watery bake?
Overcooked pasta releases starch—cook to al dente and drain well. If needed, mix in a slurry of 1 tsp cornstarch with milk before cheese. Bake longer for set texture.
Is panko better than regular breadcrumbs?
Yes! Panko gives lighter, crispier crunch that stays golden longer. Toss with extra melted butter for buttery bliss atop your Baked Mac and Cheese.
Final Thoughts
There you have it—the ultimate Baked Mac and Cheese that’s set to become your family’s new obsession, with its gooey center, crunchy top, and effortless charm. You’ve got everything for cheesy success, from pro tips to storage hacks.
Pin this now, tag a friend who needs comfort food in their life, and whip it up this week. Your kitchen (and followers) will thank you—share your golden results and let’s spread the cheesy love!